Creating your own mini Redux in React using useReducer, React Context and TypeScript
I was working on building out an organism level component for the RateSetter component library. This component used a number of atom/molecule level components from the library in addition to having a sizeable amount of logic to maintain it's state (it's a medium sized form with a number of different API calls).
Normally to solve a problem like this, I would look to use Redux and potentially Redux Saga for global state and side effects management for my application/component.
However, this component was meant to be distributed across a number of other React projects. The other projects may or may not be using Redux and Redux Saga and I didn't want to enforce the usage of these libraries in order to be able to use this component.
I had experimented with using React Context before but found that the Contexts I built became too large and maintainable that I just ended up switching to Redux + Redux Saga.
From surfing the web, I found inspiration to utilise a very handy React hook: useReducer in combination with React Context to build my own mini Redux!
The basic idea of this approach is that I'd create a Provider which would export:
- The current state of the reducer (our "store")
- The
dispatchmethod given to us byuseReducer.
That way any component that sat under the Provider would have access to the "global" state and also be able to dispatch actions which would update the global state!
I've also used useEffect in the store to handle basic side effects. For example, when a value changes in the store, it can fire an API request to retrieve some value, then save it in the store.
Project
For this article, I'm going to be creating a contrived project that will:
- Allow the user to increment and decrement a count which starts at 0
- Allow the user to select an option. This option will dictate how much each increment/decrement will add/subtract from the current value
- On change of values, post the value to an API (a side effect). The API we'll be using is: https://docs.magicthegathering.io/#api_v1cards_get. It will return the details of a Magic the Gathering card with the ID we supply: https://api.magicthegathering.io/v1/cards/{ID}
- Save the card data in our store and display it
As previously mentioned, to help us create this project with a global state, we're going to be using useReducer and React Context. I love TypeScript and will be using it to provide static type checking for our mini Redux solution.
I've made the project we're going to build available on GitHub if looking at the code directly helps you more:
 GitHub
Project Structure
package.json
src/
  App.tsx
  store/
    store.actions.tsx
    store.tsx
    store.types.ts
  components/
    CardDetails.tsx
    CardInput.tsx
Store
Let's start off by creating the global state of our project. But before that, let's identify all the Actions that our application will need. I've come up with:
- Incrementing the current count by the
changevalue - Decrementing the current count by the
changevalue - Seting the
changevalue - Seting the API response
Actions - store.actions.ts
First, let's create the actions we will be using for our application. In store.actions.ts add all of the following:
import { ICardDetails } from "./store.types";

export enum ActionType {
  IncrementId = "counter/increment",
  DecrementId = "counter/decrement",
  SetChangeValue = "value/change/set",
  SetCardDetails = "api/set"
}

interface IIncrementId {
  type: ActionType.IncrementId;
}

interface IDecrementId {
  type: ActionType.DecrementId;
}

interface ISetChangeValue {
  type: ActionType.SetChangeValue;
  payload: number;
}

interface ISetCardDetails {
  type: ActionType.SetCardDetails;
  payload: ICardDetails;
}

export type Actions =
  | IIncrementId
  | IDecrementId
  | ISetChangeValue
  | ISetCardDetails;

export const IncrementId = (): IIncrementId => ({
  type: ActionType.IncrementId
});

export const DecrementId = (): IDecrementId => ({
  type: ActionType.DecrementId
});

export const SetChangeValue = (value: number): ISetChangeValue => ({
  type: ActionType.SetChangeValue,
  payload: value
});

export const SetCardDetails = (response: ICardDetails): ISetCardDetails => ({
  type: ActionType.SetCardDetails,
  payload: response
});
First we're defining the interfaces of our four actions. Having a payload is optional, and is the data our future reducer will be receiving.
Defining an interface for each action may seem like it doesn't produce much value and adds unnecessary overhead. But the value that is obtained by doing this is from our IDE's intellisense feature. By utilising TypeScript's Discriminated Unions (as you can see in Action), our IDE is able to infer the type of our payload given the type of action. I'll go into more detail about this when we create our reducer.
We then create an action for each interface that we defined. If the actions requires a payload, we accept it as a parameter and assign it to payload. Creating all our actions in this way allows us to dispatch actions like:
dispatch(SetCardDetails(details));as opposed to:
dispatch({ type: ActionType.SetCardDetails, payload: details });Store - store.tsx
Now with our actions created, let's get to writing our store. In store.tsx add:
import React, { createContext, useReducer, useEffect } from "react";

import { SetCardDetails, Actions, ActionType } from "./store.actions";
import { ICardDetails } from "./store.types";

interface IStoreState {
  id: number;
  changeValue: number;
  cardDetails: ICardDetails | null;
}

interface IAppContext {
  state: IStoreState;
  dispatch: React.Dispatch<Actions>;
}

const initialState: IStoreState = {
  id: 1,
  changeValue: 1,
  cardDetails: null
};

const store = createContext<IAppContext>({
  state: initialState,
  dispatch: () => null
});

const { Provider } = store;

const reducer = (state: IStoreState, action: Actions) => {
  const { id: count, changeValue } = state;

  switch (action.type) {
    case ActionType.IncrementId:
      return {
        ...state,
        id: count + changeValue
      };
    case ActionType.DecrementId:
      return {
        ...state,
        id: count - changeValue
      };
    case ActionType.SetChangeValue:
      return {
        ...state,
        changeValue: action.payload
      };
    case ActionType.SetCardDetails:
      return {
        ...state,
        cardDetails: action.payload
      };
    default:
      return state;
  }
};

const AppProvider = ({ children }: { children: JSX.Element }) => {
  const [state, dispatch] = useReducer(reducer, initialState);

  useStoreSideEffect(state, dispatch);

  return <Provider value={{ state, dispatch }}>{children}</Provider>;
};

const useStoreSideEffect = (
  state: IStoreState,
  dispatch: React.Dispatch<Actions>
) => {
  useEffect(() => {
    fetch(`https://api.magicthegathering.io/v1/cards/${state.id}`)
      .then(async (res) => {
        const data: { card: ICardDetails } = await res.json();
        dispatch(SetCardDetails(data.card));
      })
      .catch((err) => {
        // do some error handling!
        console.error(`Failed to load card with ID: ${state.id}`);
      });
  }, [state.id, dispatch]);
};

export { store, AppProvider };
Let's step through this file to understand what's going on:
We define the shape of our store state, and create an initial state for it.
We define what we want to be shared by our Context (state + dispatch) and use createContext to create the initial state of our Context. () => null gets around type errors for: React.Dispatch.
We extract Provider from the createContext. We use it to create a Higher Order Component called AppProvider.
We define our reducer to be used in useReducer. It accepts a "previous" state and an action (from the Union Type we've defined). It handles each action type we've created and depending on what type/payload was passed, returns a "new" state. We're careful to not mutate the state and always return a new state given the action type + payload.
Since we utilised Discriminated Types, our IDEs Intellisense is able to identify what the payload within certain cases must be:

In AppProvider, we utilise useReducer to maintain the state of our store. We pass it the reducer function we just created and the initial store state we've created before. From useReducer we get state and dispatch. state holds the current state of our store, and dispatch is a function that accepts an action of type Actions which will be fed to our reducer to update the store state.
Read more about useReducer here.
Then we simply pass state and dispatch to our Provider wrapper.
Side Effects
We utilise the power of useEffect to perform side effects on changes in our store.
The useStoreSideEffect function takes state and dispatch, "listens" for an update to the id field saved in our store. Once there's an update, it'll perform the API request to the MTG API to retrieve the card details. Once the request is finished, the SetCardDetails action is dispatched to save it in our store.
You can probably see how this is pretty handy. It's definitely not as good as Redux side effect management libraries such as Thunk or Saga, but it's still pretty good and super simple to setup.
Components
With our store and actions all complete, it's time to utilise them within our app.
CardInput.tsx
This component will allow the user to increment/decrement (using buttons), update the change value (via a dropdown) and display the current ID. We utilise useContext to retrieve our state and dispatch from the Provider.
import React, { useContext, useCallback } from "react";
import { store } from "../store/store";
import {
  IncrementId,
  DecrementId,
  SetChangeValue
} from "../store/store.actions";

const CardInput = () => {
  const {
    state: { id, changeValue },
    dispatch
  } = useContext(store);

  const decrementEvent = useCallback(() => dispatch(DecrementId()), [dispatch]);
  const incrementEvent = useCallback(() => dispatch(IncrementId()), [dispatch]);
  const changeValueEvent = useCallback(
    (event: React.ChangeEvent<HTMLSelectElement>) =>
      dispatch(SetChangeValue(Number(event.currentTarget.value))),
    [dispatch]
  );

  return (
    <section>
      <button type="button" onClick={decrementEvent}>
        -
      </button>
      Current ID: {id}
      <button type="button" onClick={incrementEvent}>
        +
      </button>
      <label htmlFor="change-select"></label>
      <select
        id="change-select"
        value={changeValue}
        onChange={changeValueEvent}
      >
        {[1, 2, 3, 4, 5].map((val) => (
          <option key={val} value={val}>
            {val}
          </option>
        ))}
      </select>
    </section>
  );
};

export default CardInput;
CardDetails.tsx
This is a simple component that grabs the card details from our store and renders them. Again, we utilise useContext to get this data.
import React, { useContext } from "react";
import { store } from "../store/store";

const CardDetails: React.FC = () => {
  const {
    state: { cardDetails }
  } = useContext(store);

  if (!cardDetails) {
    return null;
  }

  return (
    <section>
      <h2>{cardDetails.name}</h2>
      <h3>{cardDetails.manaCost}</h3>
      <div>{cardDetails.text}</div>
    </section>
  );
};

export default CardDetails;
App.tsx
To be able to utilise useContext and access state and dispatch, we need to wrap our app with AppProvider:
import React from "react";
import { AppProvider } from "./store/store";
import CardInput from "./components/CardInput";
import CardDetails from "./components/CardDetails";

const CardApp = () => (
  <>
    <CardInput />
    <CardDetails />
  </>
);

const App = () => (
  <AppProvider>
    <CardApp />
  </AppProvider>
);

export default App;
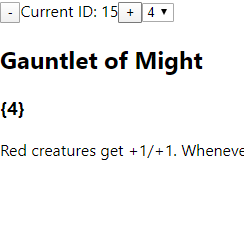
By running our app and clicking increment a few times, we can see it's retrieving card details:
Again, this project is a very contrived example that I whipped up pretty quickly. Some important enhancements we'd want to add to the project would be:
- loading indicators
- error handling
- validation
- debouncing
Hope this article was enough to help you get started building out your own mini Redux!