Setting up Plex Media Server on your Unraid Server (2020)
We've all tried to catalogue our downloaded media content manually on our machines. As our media content library grows, it becomes a headache to use and manage. Downloaded media content names are borderline illegible, you forget what you have and haven't watched and when you want to watch something, you have to scour through tens, hundreds or thousands of files.
Here's where Plex comes to the rescue.
Plex magically scans and organizes your files, automatically sorting your media beautifully and intuitively in your Plex library.
Think Netflix, but for your own media content. Plex groups similar media titles, remembers what you have, and haven't watched, where you are up to in videos, has excellent search functionality, provides additional information derived from media content metadata and much, much more.
Plex was one of the biggest reasons behind me buying and setting up my NAS. I wanted the server to hold all my media content and all of Plex's features helped me justify the costs associated with building the NAS.
In this article, I'm going to go through how I set up Plex on my Unraid NAS Server!
Note: This article assumes that you've already setup Unraid. If you haven't check out this article.
Create an account on Plex
Navigate to https://www.plex.tv/, click Sign up, enter your email, password and create your account! All pretty standard stuff.
Setting up an Unraid share
Before we install Plex on our server, we need to create an Unraid "Share" that is dedicated to holding our media content that we want Plex to catalogue.
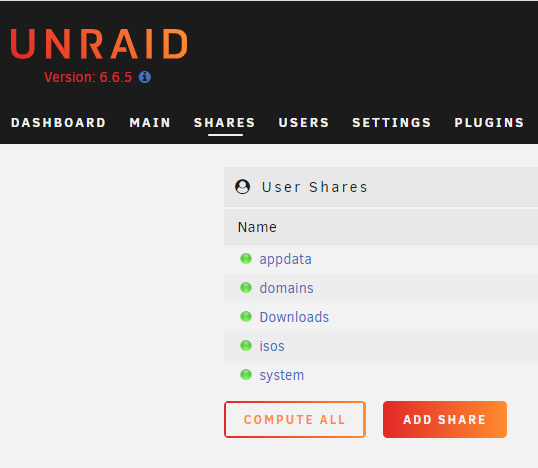
Open up Unraid, click on the Shares tab then click Add Share:
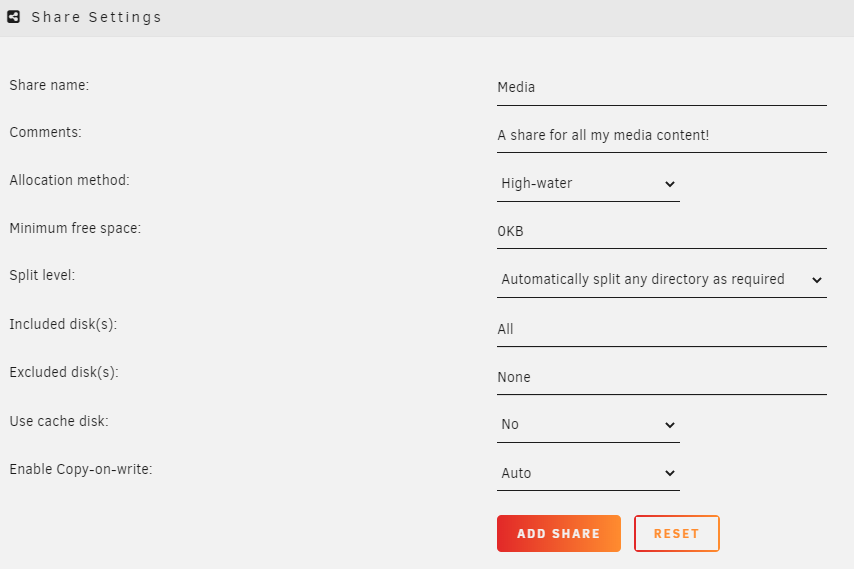
On the Share Settings page, fill out Share name and Comments and click Add Share:
Once this share has been created, I recommend creating folders that separate the type of media content you wish to store. To do this, open Unraid in your file browser (\\{UNRAID_IP}) on Windows.
For example, I created folders called Photos and Videos. So I now have the two directories:
- \\{UNRAID_IP}\Media\Photos
- \\{UNRAID_IP}\Media\Videos
Installing Plex
Community Applications
We're going to be using Docker to help us install/manage Plex. Unraid has excellent support for Docker and comes with it already set up (one of the biggest reasons why I chose the Unraid OS for my NAS).
Before we install Plex, we need to install an Unraid plugin which makes it super easy to search for and install Docker images/containers. The plugin is called Community Applications.
Navigate to Plugins -> Install Plugin, add the following URL and click Install:
https://raw.githubusercontent.com/Squidly271/community.applications/master/plugins/community.applications.plg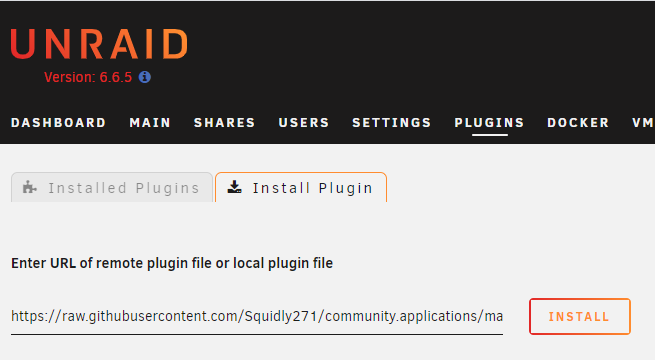
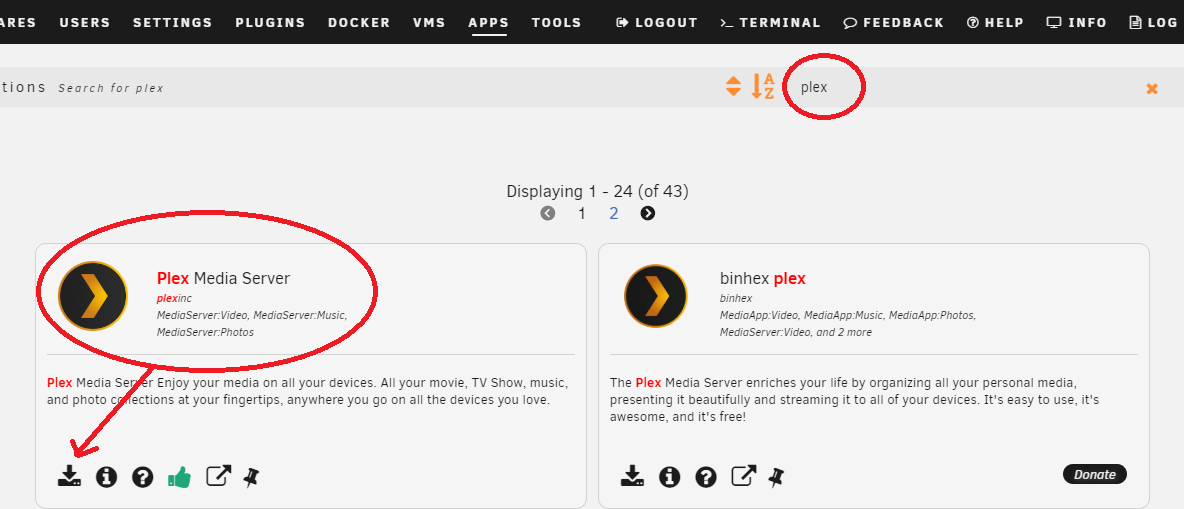
You will then have access to a new tab called Apps.
Plex Docker Image
Navigate to the new Apps tab, search for "Plex" and click the install icon for Plex Media Server by plexinc (the official Plex Docker image):
You'll be taken to a screen called Add Container.
There are three fields you'll have to add:
- Container Path: /transcode (Host Path 2):
/tmp/ - Container Path: /data (Host Path 3):
/mnt/user/{YOUR_NEW_SHARE_NAME} - Container Variable: PLEX_CLAIM (Key 1): Navigate to https://www.plex.tv/claim/. Log in, then copy paste the Plex Claim code here.
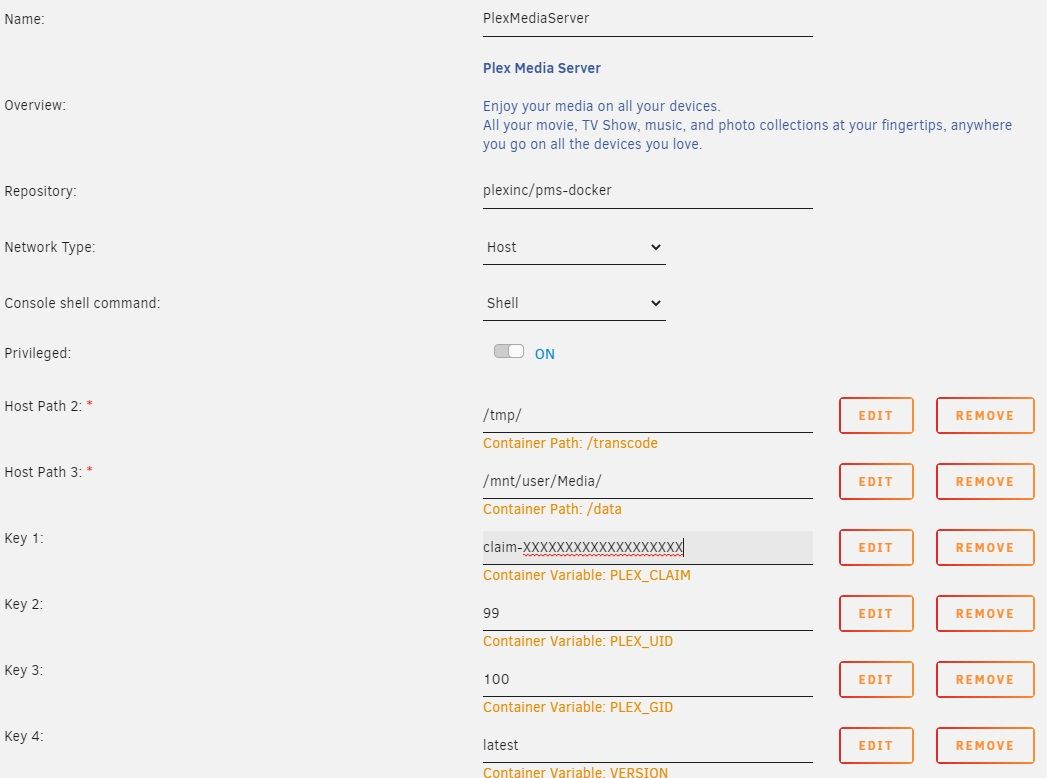
Click Apply, then the Docker image will download and the Docker container will be set up.
Setting up Plex
Now that we've setup our Plex Docker container, we have to perform some final steps within our Plex instance before we can start using it.
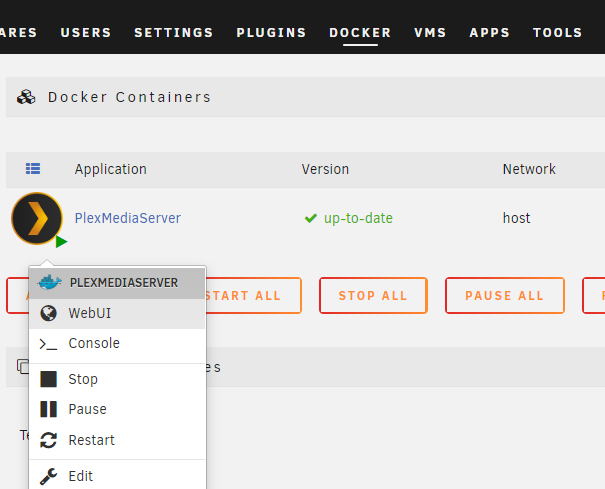
Navigate to Docker, left click the Plex logo and click WebUI:
You'll be redirected to Plex server: http://{UNRAID_IP}:32400 (which I recommend bookmarking in your browser).
Now we need to have Plex create libraries for our 2 content directories, Videos and Photos.
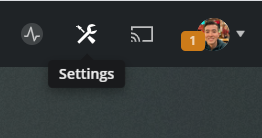
Click the settings icon in the top right:
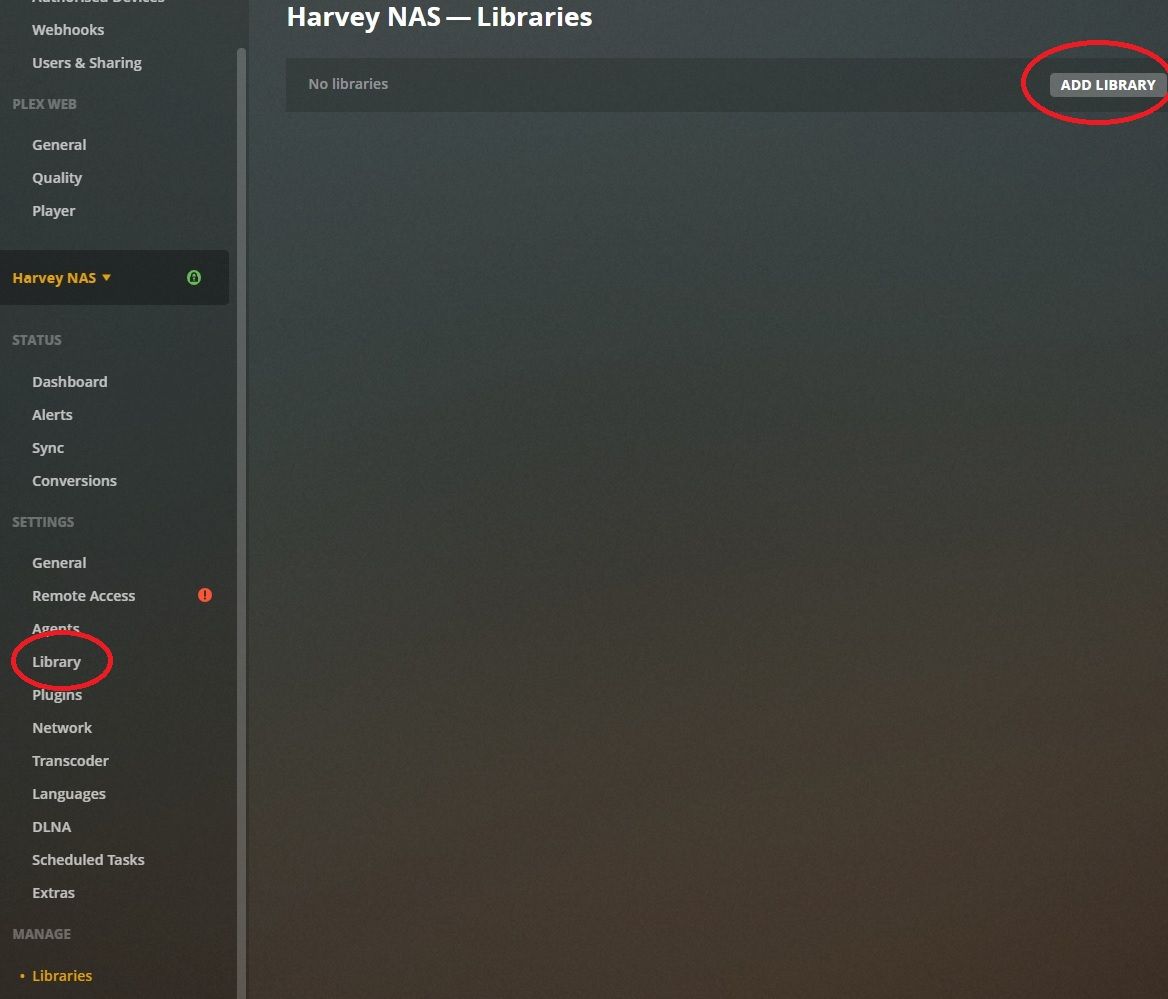
In the side menu, under your new server click Library. Then click Add Library.
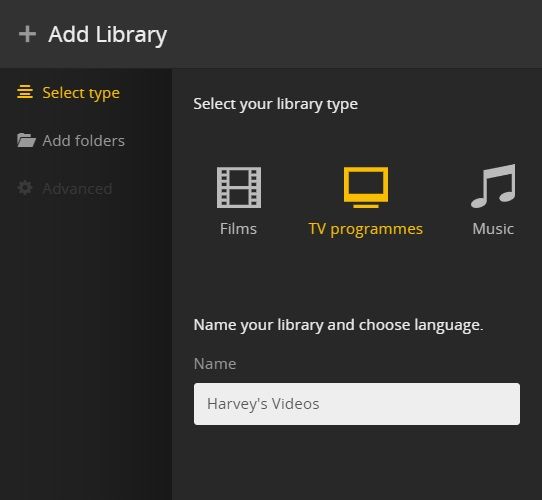
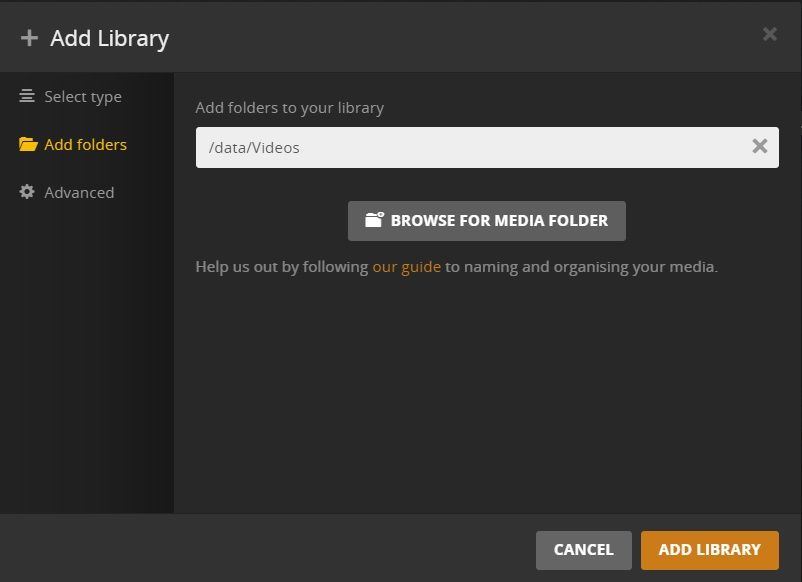
First, let's setup a Plex library for Videos. In the popup, select the TV programmes library type, enter a name for your library then go to Add folders:
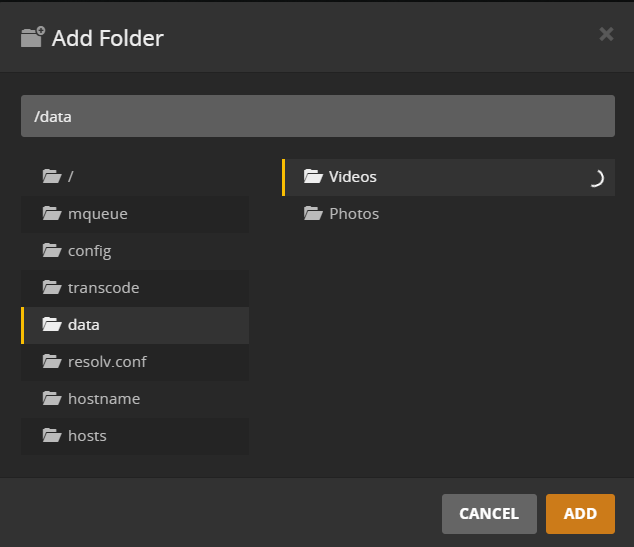
Click Browse for Media Folder and under data, you'll find the two folders we created in our Media share. Click Videos and click Add.
Then click Add Library:
The reason why it's a bit tricky to find these folders is because we've mapped the data directory in Plex to our Media share (if you look at the Docker container settings).
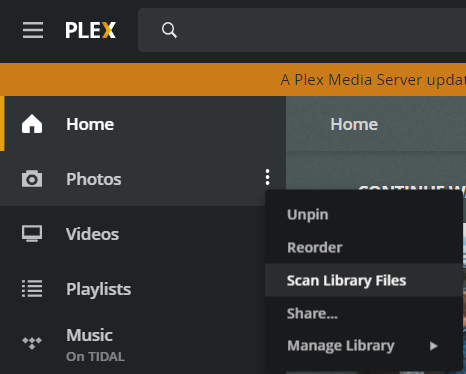
Repeat the process for Photos, but using the Photos library type. Go back home, and you should see the new Photos and Videos library. If you have any content in these directories, I recommend running Scan Library Files, so the Plex catalogue gets updated (you should do this anytime you add new content):
That's it! Plex is now set up on your Unraid server.
Now, move all your existing media content to these new directories we created in our Unraid share. Don't forget to run Scan Library Files anytime you add new content.
Note: You can also visit https://www.plex.tv/, login and click Launch to watch your media content (as opposed to opening the Unraid Plex web instance).
Next steps
I've written a few articles which provide instructions on how to set up software that automates the downloading of media content. Check them out if you're interested in setting up such a thing: