Running a Test with Multiple Test Cases using Jest/Enzyme (React)
Last year I wrote an article which outlines some tips I had for running a test with multiple test cases using Jasmine: /running-multiple-test-cases-in-jasmine/
Both at work and on my personal side projects, I've started to use React a lot more than Angular. Since Create React App comes with Jest/Enzyme out of the box, I thought I would write another article outlining how I run multiple test cases in Jest/Enzyme for my React projects!
Simple Tests Cases
If we had the following simple class that we wanted to test:
export default class CalculatorService {
  average = numberList =>
    numberList.reduce((acc, val) => acc + val, 0) / numberList.length;
}
We might have created a test for our CalculatorService like:
import CalculatorService from "./calculator.service";

describe("CalculatorService", () => {
  let calculatorService;

  beforeEach(() => {
    calculatorService = new CalculatorService();
  });

  describe("average", () => {
    it("should average the number list correctly", () => {
      const numberList = [1, 4, 5, 10];
      const res = calculatorService.average(numberList);

      expect(res).toEqual(5);
    });
  });
});
But now we want to easy run multiple test cases without creating a new statement each time. The best way that I've found to structure my tests this way is by running a forEach loop over an it statement. It's important that we have the forEach outside of the it statement otherwise we won't be able to provide information to the it statement that will inform us which test case in particular has failed. This is how I would write test cases for CalculatorService:
  describe("average", () => {
    const testCases = [
      {
        numberList: [1, 2, 3],
        expected: 2
      },
      {
        numberList: [1, 4, 10],
        expected: 5
      }
    ];

    testCases.forEach(test => {
      it(`should correctly find the average of: ${test.numberList} which is: ${
        test.expected
      }`, () => {
        const res = calculatorService.average(test.numberList);

        expect(res).toEqual(test.expected);
      });
    });
  });
As you can see, having the it statement outside allows us to write descriptive test cases which will provide an output of:
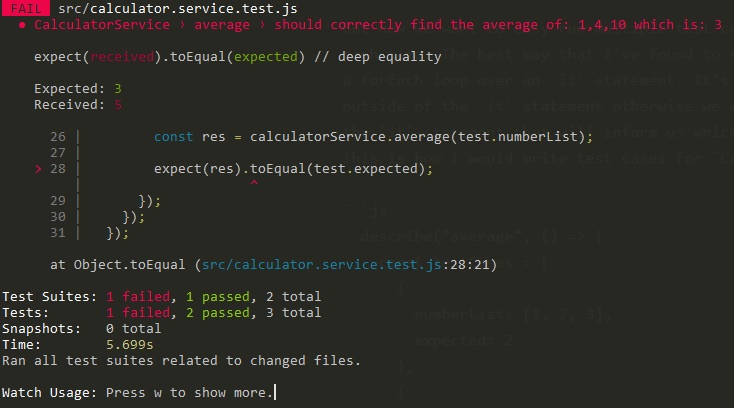
This allows us to pin-point exactly which test case has failed and rectify it.
React Components
Applying this forEach loop methodology to testing React components using shallow rendering from the Enzyme library works very well! For this example, I'll be testing the following React component:
import React from "react";
import "./List.css";

const List = ({ items, itemClickEvent }) => (
  <div className="list-container">
    {items.map(item => (
      <div
        key={item.id}
        onClick={() => itemClickEvent(item.id)}
        className="item-container"
      >
        <h2 className="heading">{item.heading}</h2>
        <div className="description">{item.description}</div>
      </div>
    ))}
  </div>
);

export default List;
I was able to create 3 test cases using the forEach structure:
import React from "react";
import User from "./User";
import List from "./List";
import { shallow } from "enzyme";
import { configure } from "enzyme";
import Adapter from "enzyme-adapter-react-16";

configure({ adapter: new Adapter() });

describe("List", () => {
  const testItems = [
    {
      id: 45,
      heading: "Test Item",
      description: "This is a test item"
    },
    {
      id: 75,
      heading: "Test Item 2",
      description: "This is a test item"
    },
    {
      id: 90,
      heading: "Test Item 3",
      description: "This is a test item"
    },
    {
      id: 150,
      heading: "Test Item 4",
      description: "This is a test item"
    },
    {
      id: 270,
      heading: "Test Item 5",
      description: "This is a test item"
    }
  ];

  let testCases = [
    {
      itemAt: 0,
      expectedToCallWith: 45
    },
    {
      itemAt: 2,
      expectedToCallWith: 90
    },
    {
      itemAt: 4,
      expectedToCallWith: 265
    }
  ];

  testCases.forEach(test => {
    it(`should call correctly call itemClickEvent with ${
      test.expectedToCallWith
    } when item at: ${test.itemAt} is clicked`, () => {
      const mockItemClickEventHandler = jest.fn();
      const props = {
        items: testItems,
        itemClickEvent: mockItemClickEventHandler
      };

      const listComponent = shallow(<List {...props} />);
      listComponent
        .find(".list-container")
        .children()
        .at(test.itemAt)
        .simulate("click");

      expect(mockItemClickEventHandler).toHaveBeenCalledWith(
        test.expectedToCallWith
      );
    });
  });
});
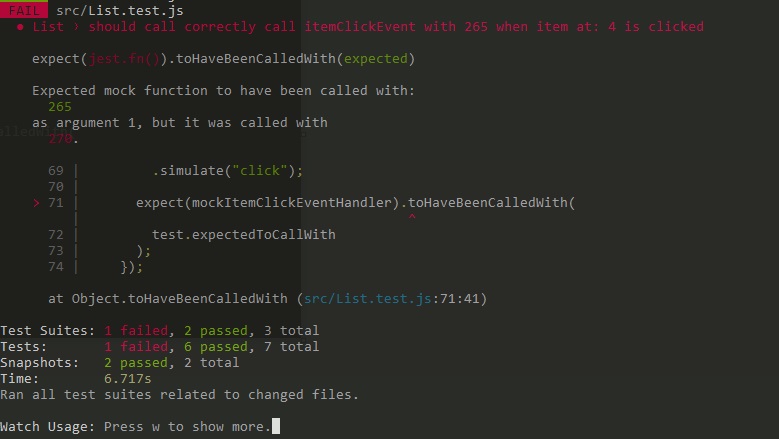
A failure of a test would give a helpful error message of:
React Component Snapshots
Again, this can be applied to React Snapshots. If we had the component:
import React from "react";
import "./user.css";

const User = ({ imgUrl, firstName, lastName, age, address }) => {
  return (
    <div className="user-container">
      <img src={imgUrl} />
      <div className="information" />
      <h1>{`${firstName} ${lastName}`}</h1>
      <span>{age}</span>
      <span>{address}</span>
    </div>
  );
};

export default User;
We can easily create multiple Snapshot test cases using react-test-renderer like so:
import React from "react";
import renderer from "react-test-renderer";
import User from "./User";

describe("User", () => {
  describe("Snapshots", () => {
    let testCases = [
      {
        imgUrl: "https://test.com",
        firstName: "Harvey",
        lastName: "Delaney",
        age: "69",
        address: "123 Fake Street"
      },
      {
        imgUrl: "https://test2.com",
        firstName: "John",
        lastName: "Doe",
        age: "35",
        address: "123 Real Street"
      }
    ];

    testCases.forEach(test => {
      it(`should have the correct snapshot for ${test.firstName} ${
        test.lastName
      }`, () => {
        const userComponent = renderer.create(<User {...test} />).toJSON();
        expect(userComponent).toMatchSnapshot();
      });
    });
  });
});
This will output two Snapshots:
// Jest Snapshot v1, https://goo.gl/fbAQLP

exports[`User Snapshots should have the correct snapshot for Harvey Delaney 1`] = `
<div
  className="user-container"
>
  <img
    src="https://test.com"
  />
  <div
    className="information"
  />
  <h1>
    Harvey Delaney
  </h1>
  <span>
    69
  </span>
  <span>
    123 Fake Street
  </span>
</div>
`;

exports[`User Snapshots should have the correct snapshot for John Doe 1`] = `
<div
  className="user-container"
>
  <img
    src="https://test2.com"
  />
  <div
    className="information"
  />
  <h1>
    John Doe
  </h1>
  <span>
    35
  </span>
  <span>
    123 Real Street
  </span>
</div>
`;
I hope this article has helped give you a bit of insight into how duplicated tests can be written more concisely by opting to use a simple forEach loop!