Setting up a Local Mock API for your Front-end (React) Project
At work, I've found myself commencing work on the front-end for a project when work for the back-end has not started or currently in progress.
Most of the time, the person/people working on the back-end have designed an interface for their API. When I was new to working on front-end projects, I used this interface to create files with mock data responses. I would import the mock data into components to help me build them out. This approach worked for most of the components - but I found myself having to write HTTP fetching logic once the backend was ready to use. I had to rewrite a number of components and tests to accommodate the different states they could be depending on the fetch response (loading/success/error).
To prevent this rework in future projects, I needed the app to perform real HTTP requests to an API. The solution was to start shipping all my frontend projects with a local mock API that matched the interface of the real backend API. This allowed me to build out the frontend and have confidence that by simply changing the environment (which should change the API endpoint URLs) of the app will make it work in that environment.
Having a local mock API also allows the app to be run without any other project dependencies. It allowed my team, myself and people outside my team to follow 3 simple steps to get the project up and running:
- Run
npm i - Run
npm run start - Open the browser and use ALL functionalities of the front-end application
I've had to work on projects that do not work locally by themselves. It was incredibly annoying when trying to get my local database into a certain state and configuring other local APIs that need to be running in parallel just to get the simple frontend app running. I was even recommended to point the local frontend app to our test environment in order to get it running, which for obvious reasons is a very bad idea.
In this article, I'm going to cover how I create own mock APIs that allow my frontend applications to run without any other external dependencies!
For this article, I'm using React and used Create React App to create the project.
Mock API Solutions
I identified three different approaches to creating a local mock API server. I'll run through the pros and cons of each.
json-server
Get a full fake REST API with zero coding in less than 30 seconds (seriously). Created with <3 for front-end developers who need a quick back-end for prototyping and mocking.
json-server is an excellent library that provides everything you need to start experimenting with a new frontend project. It provides a "database" that persists the state in a db.json file. It ships with all CRUD operations that allow you to mutate (create, update, delete) that state and provides a number of methods to retrieve the data stored in db.json (filter, paginate, sort, slice).
What it doesn't do well in is it's ability to provide the developer more control over how logic in an API might work. For example, you could have a non-standard endpoint that is a POST that doesn't save any data, but returns specific responses based on data within the body. json-server doesn't provide elegant support for handling this use case.
I needed to have this control over logic within my mock APIs to match how our real backend worked. For this reason, I couldn't use json-server.
Creating a simple Express server
One option I considered was to just spin up a simple Node/Express server alongside the frontend project. For each route, you'd create a "replica" endpoint in the Express server which would aim to mimic the logic/data of the real backend endpoint.
This option requires the most work to get up and running, but provided me with the most control over the mock API.
I was close to going with this approach, until I found a library which provided me with control over the logic within the endpoints and helped create endpoints quicker.
connect-api-mocker
connect-api-mocker is a connect.js middleware that fakes REST API server with filesystem. It will be helpful when you try to test your application without the actual REST API server available to you.
connect-api-mocker allows you to create mocks using your file system. Instead of creating a number of routes within Express, you can structure your mock API using directories and files. I was a bit sceptical of creating my mock API like this, but found it to be very easy to create and maintain.
For example, instead of:
...
app.get('/foo', (req, res) => res.json({ "fake": "foo" }));
app.get('/bar/baz', (req, res) => res.json({ "fake": "barbaz" }));
...
You'd create the files:
/foo
  GET.json
/bar
  /baz
    GET.json
Where each GET.json would hold the response data.
connect-api-mocker can be used with a bunch of Node HTTP frameworks such as Connect, Express and BrowserSync. We'll be using Express for this article.
This library met my needs so I've begun creating most of my local mock API servers with it!
Setting up the Mock API
I've created a repo with all the code created in this article here:
 GitHub
The basic structure of our project will be:
/mock-api
    ...
/public
    ...
/src
    ...
package.json
Installing connect-api-mocker
Install the library using:
npm i --save-dev express connect-api-mocker
In the /mock-api directory, create a file called app.js. This will be the entry-point of our mock API Express server. Put the following inside it:
const express = require('express');
const apiMocker = require('connect-api-mocker');

const port = 9000;
const app = express();

app.use('/api', apiMocker('mock-api'));

console.log(`Mock API Server is up and running at: http://localhost:${port}`);
app.listen(port);
Creating your mocks
For the purpose of this article, we are going to have 2 different API endpoints that our React app will consume:
GET
/user/:userName

CASE 1:
userName = "harvey" =>
Status: 200
Response:
{
    "id": 1,
    "userName": "harvey",
    "age": "24"
}

CASE 2:
userName = "unauthorised" =>
Status: 403
Response : { }

CASE 3:
userName = ({USERNAME}) =>
Status: 200
Response :
{
    "id": 0,
    "userName": {USERNAME},
    "age": "20"
}
POST
/user

CASE 4:
Body:
{
    "id": 3,
    "userName": "goodBoy",
    "age": 35
}
=>
Status: 201
Response:
{
    "id": 3,
    "userName": "goodBoy",
    "age": 35
}

CASE 5:
Body:
{
    "id": 1,
    "userName": "harvey",
    "age": 20
}
=>
Status: 209
Response:
{
    "errorMessage": "UserId already exists"
}
We will mock the three different responses that our first GET endpoint returns.
Case 1
In mock-api create a user directory and within it, create another directory called harvey. In the harvey directory, create GET.json and place within it:
{
    "id": 1,
    "userName": "harvey",
    "age": "24"
}
You should now have a folder structure that looks like this:
/mock-api
    /user
        /harvey
            GET.json
Now, if you run node mock-api/app.js and then run cURL on the route like:
curl -i http://localhost:9000/api/user/harvey
You should receive a 200 OK with the JSON we placed in the GET.json file:
HTTP/1.1 200 OK
X-Powered-By: Express
Content-Type: application/json
Date: Tue, 21 Apr 2020 09:45:48 GMT
Connection: keep-alive
Content-Length: 53

{
  "id": 1,
  "userName": "harvey",
  "age": "24"
}
Hopefully this simple example shows how the folder structure maps to the API route.
Case 2
In /mock-api/user, create the directory unauthorised-user. In unauthorised-user, create a GET.js (making sure you create a .js and NOT a .json file) and place the following within it:
module.exports = (req, res) => res.sendStatus(403);
Your directory structure should now look like:
/mock-api
    /user
        /harvey
            GET.json
        /unauthorised-user
            GET.js
This is a custom response and more can be read about them in the connect-api-mocker documentation.
Re-load the mock API server then by running cURL on the route, you should see:
$ curl -i http://localhost:9000/api/user/unauthorised-user
HTTP/1.1 403 Forbidden
X-Powered-By: Express
Date: Tue, 21 Apr 2020 09:48:38 GMT
Connection: keep-alive
Content-Length: 0
Case 3
This will be the catch-all case, so any request that you send other than harvey and unauthorised will return this. We will be utilising the wildcard feature connect-api-mocker ships with.
Create __userName__ under /user and place a GET.js within it. In GET.json:
module.exports = (req, res) =>
  res.status(200).json({
    id: 0,
    userName: req.params.userName,
    age: 20
  });
Now your structure should be:
/mock-api
    /user
        /harvey
            GET.json
        /unauthorised
            GET.json
        /__userName__
            GET.js
Once again, reload the server and run cURL on the new route and you should see:
$ curl -i http://localhost:9000/api/user/testtest
HTTP/1.1 200 OK
X-Powered-By: Express
Content-Type: application/json; charset=utf-8
Content-Length: 39
ETag: W/"27-HEjSp+M55SG7EkrFWNsgMVUsqUA"
Date: Tue, 21 Apr 2020 10:39:49 GMT
Connection: keep-alive

{"id":0,"userName":"testtest","age":20}
Case 4 and 5
Our final two cases will be handled by a single file called POST.js. Create POST.js under /user and place within it:
module.exports = (req, res) => {
    const userId = req.body.id;

    if (userId === 1) {
        return res.sendStatus(409);
    }

    return res.status(201).send({
        "id": req.body.id,
        "userName": req.body.userName,
        "age": req.body.age
    });
}
Your final mock-api directory structure should look like:
/mock-api
    /user
        /harvey
            GET.json
        /unauthorised
            GET.json
        /__userName__
            GET.js
        POST.js
Making requests to the two endpoints using cURL should look like:
$ curl -i -X POST -H "Content-Type: application/json" -d "{\"id\":1}" http://localhost:9000/api/user
HTTP/1.1 409 Conflict
X-Powered-By: Express
Content-Type: text/plain; charset=utf-8
Content-Length: 8
ETag: W/"8-OfewgPiFJ3o3XA5wgKRYk2ZHNlU"
Date: Tue, 21 Apr 2020 09:58:54 GMT
Connection: keep-alive
Now we have successfully created our Mock API! Now we will configure our React app to consume it correctly.
Configure the Proxy (Fixing CORS issues)
If you make a request to your mock API server from your front-end app, you will run into CORS issues. this is because the mock API is running in a different domain to your front-end app:

Read more about CORS here.
If using create-react-app
create-react-app ships with a handy proxy feature for local development which provides a solution to the issue. To use it, in package.json add:
...
"proxy": "http://localhost:9000/api",
...Read more about create-react-app proxy here.
If not using create-react-app
If you're not using create-react-app, you can't utilise this proxy feature. I suggest installing the Express CORS middleware library to solve this problem.
npm i -D corsThen in mock-api/app.js, add:
...
const app = express();

const cors = require('cors');
app.use(cors());
...
Making API Requests from React
Throughout your React app, you will need to call the mock API in a specific way. You need to make sure that all endpoints are called starting with /. It should not include http://localhost:9000. For example, if we were to consume CASE 1, we would call it using Fetch like:
...
const res = await fetch('/user/harvey');
const data = await res.json();
...
Replace all your endpoints through the app in a similar way.
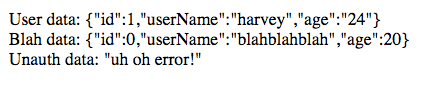
As an example, I create the following in App.js to check if the GET requests were reachable from our front-end:
import React, { useEffect, useState } from 'react';

const useFetch = (url) => {
  const [data, setData] = useState(null);

  useEffect(() => {
    fetch(url).then(async res => {
      if (res.status !== 200) {
        setData('uh oh error!');
      }
      const data = await res.json();
      setData(data);
    });
  }, [setData, url]);

  return [data];
}

const App = () => {
  const [harveyData] = useFetch('/user/harvey');
  const [blahData] = useFetch('/user/blahblahblah');
  const [unauthData] = useFetch('/user/unauthorised-user');

  return (
    <div>
      <div>
        User data: {JSON.stringify(harveyData)}
      </div>
      <div>
        Blah data: {JSON.stringify(blahData)}
      </div>
      <div>
        Unauth data: {JSON.stringify(unauthData)}
      </div>
    </div>
  );
}

export default App;
After running npm run start and node mock-api/app.js in two terminals, we should see:
Running the Mock Server
You will usually want to run the mock server the same time as you spin up your React application. You can choose to open two terminals, one that runs the mock API server and one that runs your app.
To do this, we will be making some changes to the package.json scripts.
To run both at once, I used npm-run-all. This library allows you to run multiple npm scripts in parallel. Install using:
npm i --save-dev npm-run-all
Now in your package.json, under "scripts", add the two entries:
...
"scripts": {
  ...
  "mock-api": "node ./mock-api/app.js",
  "dev": "run-p start mock-api",
  ...
},
...
This will effectively run npm run start and npm run mock-api in parallel.
Now run both using npm run dev. Your React app will now consume the mock API routes! Enjoy!
Check out the repository I created for this article and give it a star if this helped you out :)
GitHub