Hosting Multiple Websites with SSL using Docker, Nginx and a VPS
This will be the first of a 3 part blog series on how I set up my current website(s) and how you can get something similar up and running in no time!
I currently have my blog running on this domain, my personal website at: https://www.harveydelaney.com and my Jenkins CI/CD server as well.
You should follow this blog if you want to be able to host multiple websites on one Virtual Private Server (VPS) each under a different sub-domain. Examples of websites that you can run include:
- A blog
- A personal portfolio of your projects
- A continuous integration/delivery server
- A flavour of database
- An API
- ... and much more!
We will utilise the power of Docker that will allow us to run all these services one server! Each service will be able to be deployed to it's own sub-domain on your server. Plus, we will also be able to implement free, automated SSL encryption on each website!
Requirements
Before we begin, you will need a few things to get started:
First of all, you'll need to have a basic understanding of both Docker and NGINX. If not, please refer to some simple tutorials before reading this post :).
You will also need access to your own Virtual Private Server (VPS). I recommend using one of these:
- Vultr ($50 credit)
- Digital Ocean
- Amazon Web Services - receive a year of free tier access to their services.
For this tutorial, I will be using an Ubuntu 16.04 server on Vultr.
You will need a domain name. I personally recommend using NameCheap. You can use any other domain registrars like GoDaddy as well.
Server Architecture
The architecture of my server is as follows:
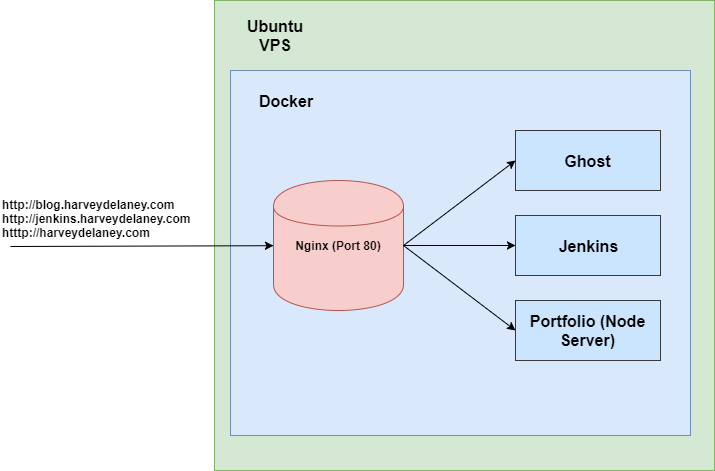
This well-known server architecture utilises Nginx as a reverse-proxy. This basically means that Nginx as a network mapper of sorts. It takes the input address and redirects the user to the port on the server that contains the correct website (running on Docker).
In my case, the mappings are as follows:
- blog.harveydelaney.com -> port 2368
- jenkins.harveydelaney.com -> port 8080
- harveydelaney.com -> port 80
This architecture makes the server very modularised/component based. A modularised server makes it easy to modify one service without affecting others. This may include starting, stopping, adding or removing any service/site.
Setting up your VPS
Docker
First, we need to install Docker!
Follow this great tutorial on setting up Docker thanks to DigitalOcean: Docker Ubuntu 16.04 Installation.
While it is possible to instead manage all Docker containers using the command line and/or scripts, it will eventually get tedious in updating and re-deploying these containers/images once you have a large number of websites.
To help us solve this problem, we will utilise something called Docker Compose. So what does Docker Compose bring to the table? Docker Compose allows us to create a Yaml (.yml) file that contains all configuration for Docker containers/images and allows them to be easily created and started. A better description comes from the Docker site itself:
"Compose is a tool for defining and running multi-container Docker applications. With Compose, you use a Compose file to configure your application’s services. Then, using a single command, you create and start all the services from your configuration. Compose is great for development, testing, and staging environments, as well as CI workflows."
Since we are creating a multi-container Docker setup, it makes a lot of sense to use Compose.
Please follow this tutorial to setup Docker Compose on your VPS: Installing Docker Compose
Domain Name Settings
Before we create our first Docker Compose file, let's configure our DNS to work with Nginx and Docker! I'll be using NameCheap, if you're with another registrar, you'll have to follow their tutorials.
Logging into our NameCheap account, click the manage domain button.

Next, we navigate to Advanced DNS:

Next, we click Add a New Record. Under Type, select CNAME. Under Host, input the sub-domain address we want. For example, if I entered blog for my harveydelaney.com domain, I would end up with blog.harveydelaney.com. Under value, we choose the IP address of our VPS and leave TTL as automatic.
NGINX and SSL
The core of our server setup utilises two Docker images:
These two Docker images work perfectly alongside each other. nginx-proxy will run our Nginx reverse-proxy service and letsencrypt-nginx-proxy-companion will connect to this reverse-proxy and automatically generate, refresh and maintain SSL certificates ... for free!
Let's finally create our first Docker Compose file that will allow us to use Nginx and SSL with our Dockerised websites.
Let's create a directory for all of our Docker files. mkdir docker
Now let's create our first Compose file!cd docker
touch docker-compose.yml
In our docker-compose.yml file, copy and paste the following:
services:
  proxy:
    image: jwilder/nginx-proxy
    container_name: nginx-proxy
    ports:
      - '80:80'
      - '443:443'
    volumes:
      - /var/run/docker.sock:/tmp/docker.sock:ro
      - /etc/nginx/vhost.d
      - /usr/share/nginx/html
      - ./docker/certs:/etc/nginx/certs:ro

  ssl-companion:
    image: jrcs/letsencrypt-nginx-proxy-companion
    container_name: ssl-companion
    volumes:
      - ./docker/certs:/etc/nginx/certs:rw
      - /var/run/docker.sock:/var/run/docker.sock:ro
    volumes_from:
      - proxy
    depends_on:
      - proxy
It may seem like the file has a lot going on, but the main things we need to know are where the images are storing our certificates: in my case, I specified them to be under ./docker/certs as we can see: ./docker/certs:/etc/nginx/certs:ro under proxy and ./docker/certs:/etc/nginx/certs:rw under ssl-companion. Change ./docker/certs part in both services to where you wish your websites SSL certificates to be stored on your VPS.
To run our new docker-compose.yml file, type: sudo docker-compose up
Running this Compose file will do a number of things: First, Docker will pull these two images from the Docker repository (if they aren't already downloaded). Next, Docker will create a container using these images and spin them up.
I would recommend running the Compose file using detached mode sudo docker-compose up -d. This will run the services in the background and will continue to run when exiting your VPS.
To stop the containers in detached mode type: sudo docker-compose stop.
Adding Websites
With the Nginx and LetsEncrypt services running in their respective containers in the background, all we have to do create a new website is add a few environmental variables.
Either we can run new websites using the Docker CLI, or add them to the Compose file. I highly recommend adding them to the Compose file as it makes it so much easier to maintain.
A simple example of adding another website is done under services in the same docker-compose.yml file:
example-website:
  image: example-website
  container_name: example-website
  environment:
    - VIRTUAL_HOST=blog.domainname.com
    - VIRTUAL_PORT=3000
    - LETSENCRYPT_HOST=blog.domainname.com
    - LETSENCRYPT_EMAIL=myemail@domainname.com
VIRTUAL_HOST and LETSENCRYPT_HOST inform Nginx and SSL companion what domain/sub-domain it should listen for/generate an SSL certificate for.VIRTUAL_PORT tells Nginx what port to redirect the user to given the input domain.LETSENCRYPT_EMAIL is used by LetsEncrypt to send you emails regarding potential issues with your certificates.
Conclusion
In a short amount of time, we have successfully deployed our SSL, Docker, Nginx server running. In the next blog, utilising the server we just set up, I will explain how to:
- Setup a Continuous Integration service using Jenkins to help you deploy more services/sites at higher velocity!
- Setup a NodeJS/Express server
- Setup a Ghost blog server