Setting up a Private NPM Registry and Publishing CI/CD Pipeline
This article follows on from how I setup a React component library at work. Read it here: https://blog.harveydelaney.com/creating-your-own-react-component-library/.
With the RateSetter component library all set up, we now needed a way to privately host, distribute and manage versioning it. Private hosting was required as we only wanted engineers at RateSetter to see and use the package. Versioning was essential as we needed to be able to manage this evolving library being used in a number of projects throughout the company. The component library being an NPM package met all these requirements.
Note: For this article I'll be creating a scoped NPM package:
Scopes are a way of grouping related packages together, and also affect a few things about the way npm treats the package.
Read more about scoped packages here.
Choosing an NPM Registry
First up, we have to choose how we want to host our registry. There are two options for hosting a private NPM registry for your organisation:
Paid
The benefits of paid service is that you receive a working solution out of the box. There is little to no configuration required. You also receive great documentation and support that help you use the service. The downside is that you have to pay for the service and risk having your packages removed if they violate the services T&Cs or compromised in the unlikely event of a breach.
Some of these paid services are:
- NPM ($7 / user / month)
- ProGet ($1000 / year)
- MyGet ($165 / year)
- JFrog Bintray ($150 / month)
It's important to note that while some services are more expensive that others, they offer additional features like hosting other package libraries like NuGet (.Net), Maven (Java) and Gems (Ruby).
Free
Benefits of free services are that they are... free and all the packages are hosted on your servers. The downside is that there is usually overhead with setting up these services as they are required to be self-hosted.
Some examples of free services are:
- Verdaccio
- ProGet (self-hosted)
- CNPMJS
- Sinopia
- Building your own NPM registry
Setting up the Private NPM Registry
We chose ProGet to host our private NPM registry that would initially host the component library, and later, all other future RateSetter NPM packages.
The main reason behind this decision was that we were currently self-hosting ProGet which was being used for our NuGet packages. It made sense to just use this and add an NPM registry alongside the NuGet registry.
However, if we didn't have ProGet already setup, I would have chosen Verdaccio. It's very popular (8.5k GitHub stars), actively maintained as of (21/12/2019), has many questions asked/answered about it on Stack Overflow in addition to excellent documentation on it's website.
Manual Publishing
As mentioned at the start of this article, we will be publishing to a scoped package registry. For this example, I'm using the scope: @harvey and the package name: react-component-library.
You'll need some information handy from your NPM registry before we can publish our first package:
- Your package repository
- Registry URL
- Email, Username, Password that you wish to use to log in to the registry
With your registry URL, run:
npm config set @harvey:registry http://YOUR_REGISTRY:PORT
This command saves an NPM config that points all scoped registry requests to our private NPM registry.
Now create a new user by running:
npm adduser --registry http://YOUR_REGISTRY:PORT
Note: you have have seen other articles use: npm login. npm login is an alias to adduser and behaves exactly the same way.
Follow the interactive tool by inputting a Username, Password and Email address. The command will then communicate with the registry to create configuration that are saved under .npmrc. .npmrc (aka NPM Runtime Configurations) can be found at: /Users/Username/.npmrc (on Windows). For example, for me it created: //localhost:4873/:_authToken="MaDSxMyURlERcdThvWbg6A==". This file and it's contents are used by NPM to authenticate all requests made to registries (public and private).
Read more about .npmrc here: https://docs.npmjs.com/files/npmrc
Now in package.json in your package repository, change the name from package-name to @scope/package-name, for example:
"name": "react-component-library", => "name": "@harvey/react-component-library",
NPM will then know to publish to your scoped, private registry as opposed to the public NPM registry.
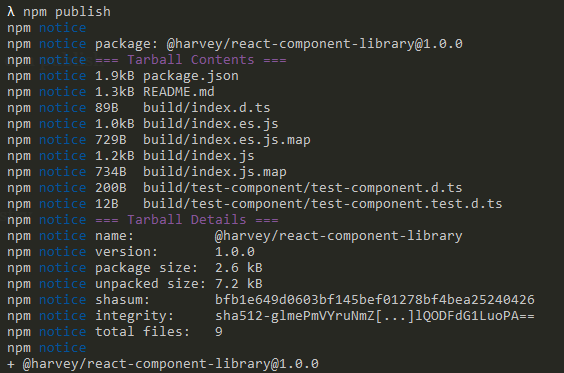
Now running npm publish in your repository's root directory should work:
Automated Publishing (Pipeline)
Manual publishing can work if you're working solo or as a small team. But it'll get to a point where it becomes too hard to keep track of what versions of the package had been deployed. It is also risky and error prone as developers will have permissions to publish on their local machines and could publish packages without running tests or without having their code reviewed through a pull request.
For this section, I'll be going through how I automated NPM publishing by creating our NPM CI publishing pipeline using BuildKite.
First we need to create a BuildKite agent, BuildKite pipeline and link the pipeline to our library repo on GitHub. Read my previous article to find out how: https://blog.harveydelaney.com/setting-up-buildkite-and-your-first-ci-pipeline-in-2-hours/.
We will be defining our pipeline steps through .yml and .bash scripts in the .buildkite directory of our package repository.
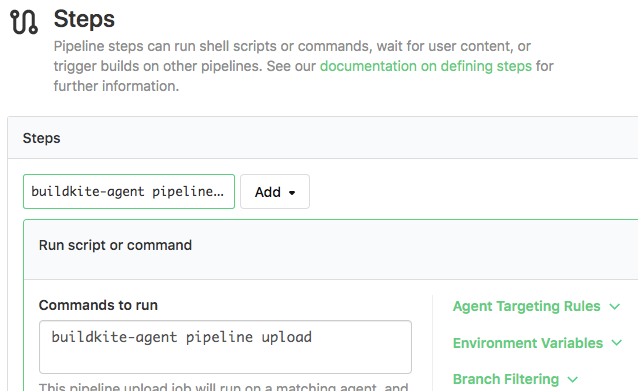
Note: To have BuildKite read from the .buildkite directory, you need to add buildkite-agent pipeline upload to the Commands to Run section in your pipeline:
Our pipeline will have two steps:
- Run linting and tests
- Build, package and publish the package to our private NPM registry
Step 1 - Linting and Tests
The first step on your BuildKite pipeline will be a simple one liner: npm run lint && npm run test.
These commands help make sure code warnings/errors aren't present and components are behaving as expected before the package is published to the registry. You can add other checks such as Prettier to this step as well.
Our pipeline.yml under .buildkite will be:
steps:
  - label: "Install and Lint"
    command: "npm run lint && npm run test"
Step 2 - Build and Publishing
Before Step 2, we will be adding a Block Step. This Block Step will allow the engineer to elect what kind of update they pushed to the component library. We use Semantic Versioning to help us determine what type of release it should be (Major | Minor | Patch):
steps:
  - label: "Install and Lint"
    command: "npm run lint && npm run test"

  - block: Publish to NPM
    fields:
    - select: "NPM Package Version"
      key: "npm-semver-type"
      required: true
      options:
        - label: "Major"
          value: "major"
        - label: "Minor"
          value: "minor"
        - label: "Patch"
          value: "patch"
The above .yaml file creates a block step that presents three options to the engineer: Major, Minor and Patch. The selection is saved to the BuildKite build meta-data which can be accessed in proceeding steps.
Now we need to add the final step, Publish:
steps:
  - label: "Install and Lint"
    command: "npm run lint && npm run test"

  - block: Publish to NPM
    fields:
    - select: "NPM Package Version"
      key: "npm-semver-type"
      required: true
      options:
        - label: "Major"
          value: "major"
        - label: "Minor"
          value: "minor"
        - label: "Patch"
          value: "patch"

  - label: "Publish"
    command: "bash ./.buildkite/publish.bash"
As you can see, our final step is running a bash command as we need to run a number of commands. The publish.bash file will be:
#!/usr/bin/env bash

# INCREMENT PACKAGE VERSION
semverIncrementType="$(buildkite-agent meta-data get npm-semver-type)"
npm version $semverIncrementType

# INSTALL REQUIRED PACKAGES
npm ci
npm run build

# CONFIGURE NPM SETTINGS
echo "@harvey:registry=http://YOUR_REGISTRY:PORT" >> .npmrc
echo "unsafe-perm=true"
echo "//YOUR_REGISTRY:PORT/:_password:YOUR_NPM_PASSWORD" >> .npmrc
echo "//YOUR_REGISTRY:PORT/:username:YOUR_NPM_USERNAME" >> .npmrc
echo "//YOUR_REGISTRY:PORT/:email:YOUR_NPM_EMAIL" >> .npmrc
echo "//YOUR_REGISTRY:PORT/:always-auth=false" >> .npmrc

# Publish!
npm publish

# UPDATE PACKAGE VERSION IN REPOSITORY
git push
Let's break this bash script down. First, we're grabbing the version from the block step by using buildkite-agent meta-data get and using that to increment the version of the package appropriately - read more about npm version here.
We then get our package ready to be published by running npm ci && npm run build which will produce our built package in the output folder of /build.
The next block of echos redirecting to an .npmrc file may seem a bit strange. It's how I decided configure the build instance to setup the correct NPM settings for publishing to my private NPM registry. It creates all the settings that we created for in the Manual Publishing section above. It was done like this as npm adduser is an interactive command that can't be interact with in our pipeline. You could also replace _password, username and email with a single _authToken field instead.
Next, the script runs the npm publish command!
Finally, we need to update our repository to have the latest version by simply pushing to it (requires the BuildKite agent to have write permissions to your repository). We only have to push because npm version adds a commit with the latest package version in package.json and package-lock.json. This will only occur if publishing is successful.
End Result
Once an update has been pushed to your library repository, BuildKite should read the config we created in .buildkite in the repository then generate and kick off the pipeline:
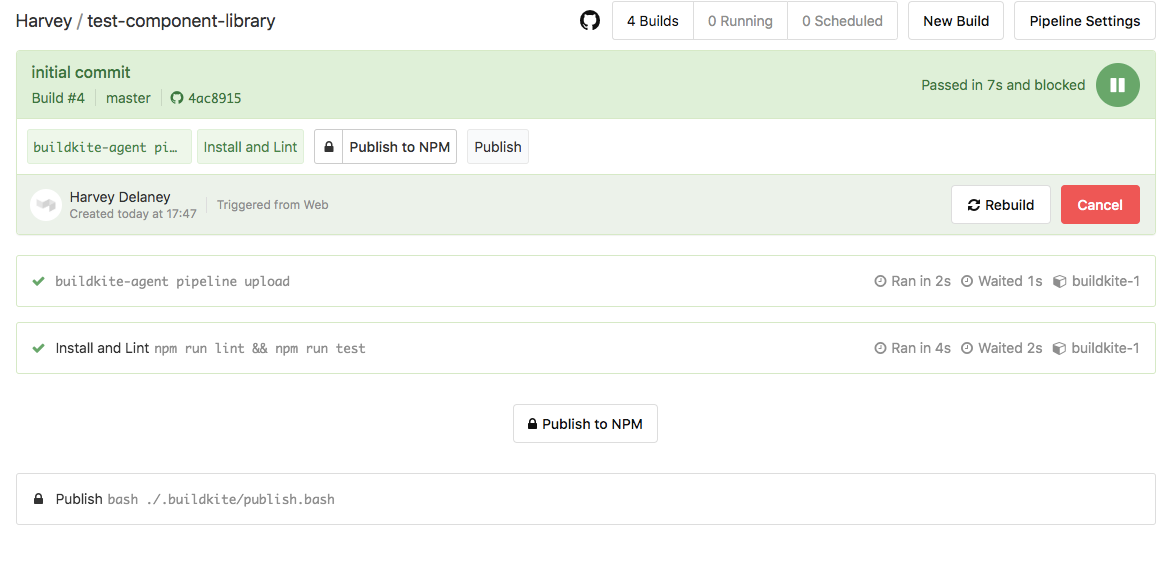
Clicking Publish to NPM should present the modal:
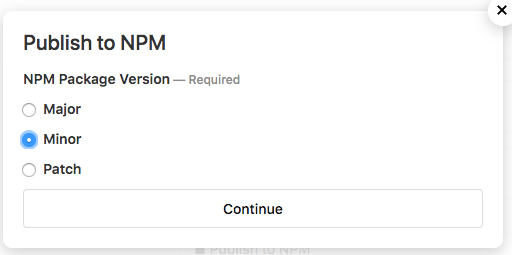
On clicking continue, the publish.bash script should be run. If everything is successful, you should see your new package was published, in addition to the package.json version being incremented appropriately:
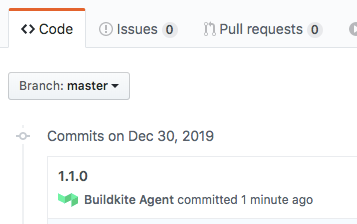
Now go and enjoy the benefits of having your own private NPM registry and NPM publishing CI/CD pipeline!