Using Jenkins CI/CD for your NodeJS app: Building, Testing and Deploying
This is final entry on how I set up my current server architecture. You can find the second blog post here: Setting up Jenkins on your Docker instance for CI/CD
We've already learned how to setup our Jenkins instance running on Docker. This entry will teach you how to run builds, test and then deploy your apps! For this example, we will be deploying a Node application.
Creating the Node Application
If you've already created your Node app, please skip this section.
I'm just going to be creating a very simple Node app, using ExpressJS that will just return us "Hello World". You can follow along or just Fork and then Clone my repo at: https://github.com/HarveyD/node-jenkins-app-example
First let's setup our git repo. Using GitHub, create a repository. Grab the ssh url and then clone the freshly created repository: git clone git@github.com:HarveyD/node-jenkins-app-example.git.
Now enter the directory and let's setup our package.json by typing npm init. Follow all the CLI prompts to get your package.json file:
{
  "name": "node-jenkins-app-example",
  "version": "0.0.1",
  "description": "Simple Hello World demo app.",
  "main": "app.js",
  "scripts": {
    "test": "echo \"Error: no test specified\" && exit 1"
  },
  "author": "Harvey Delaney",
  "license": "ISC"
}
Next, create your app.js file: touch app.js. Now add ExpressJS by typing: npm install --save express.
Using the "Hello World" example found on the Express homepage, copy the following in:
const express = require('express')
const app = express()

app.get('/', (req, res) => res.send('Hello World!'))

var server = app.listen(3000, () => {
    console.log("Listening on port " + server.address().port + "...");
});
Run the app by typing node app.js and hopefully if you go to localhost:3000 it will display "Hello World". How awesome is Express? So quick and easy to get started!
Let's also add some quick tests using Jasmine (this isn't a Jasmine tutorial so I'm gonna run through it quick). Following this blog post:
npm install --save-dev node-jasminenpm install --save request- Modify the
scripts.testscript inpackage.jsonto be:"test": "jasmine-node spec". package.jsonshould look like:
{
  "name": "node-jenkins-app-example",
  "version": "1.0.0",
  "description": "",
  "main": "app.js",
  "scripts": {
    "test": "jasmine-node spec"
  },
  "author": "",
  "license": "ISC",
  "dependencies": {
    "express": "^4.16.3",
    "request": "^2.85.0"
  },
  "devDependencies": {
    "jasmine-node": "^1.14.5"
  }
}
mkdir speccd spectouch helloWorld-spec.js- Add the below code to the spec file:
var request = require("request");
var base_url = "http://localhost:3000/";
var server = require("../app.js");

describe("Hello World Server", function() {
  describe("GET /", function() {
    it("returns status code 200", function(done) {
      request.get(base_url, function(error, response, body) {
        expect(response.statusCode).toBe(200);
        done();
      });
    });

    it("returns Hello World", function(done) {
      request.get(base_url, function(error, response, body) {
        expect(body).toBe("Hello World!");
        done();

        server.close();
      });
    });
  });
});
Run npm test and all the tests should pass. Great stuff!
Configuring Jenkins Build/Test/Deploy steps
Installing Node on Jenkins
If we want to be able to build and test our node application, we have to first install Node on Jenkins! To do this, navigate to Manage Jenkins -> Manage Plugins -> Search for NodeJS and install the plugin.
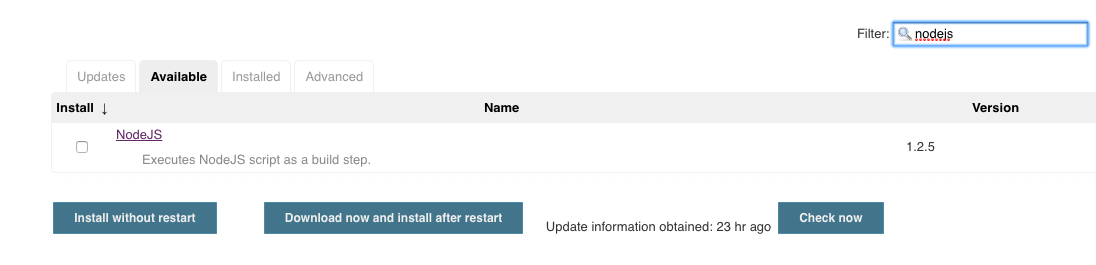 .
.
Now navigate to Manage Jenkins -> Global Tool Configuration and look for the NodeJS heading. Install whatever version of NodeJS you require and click save:
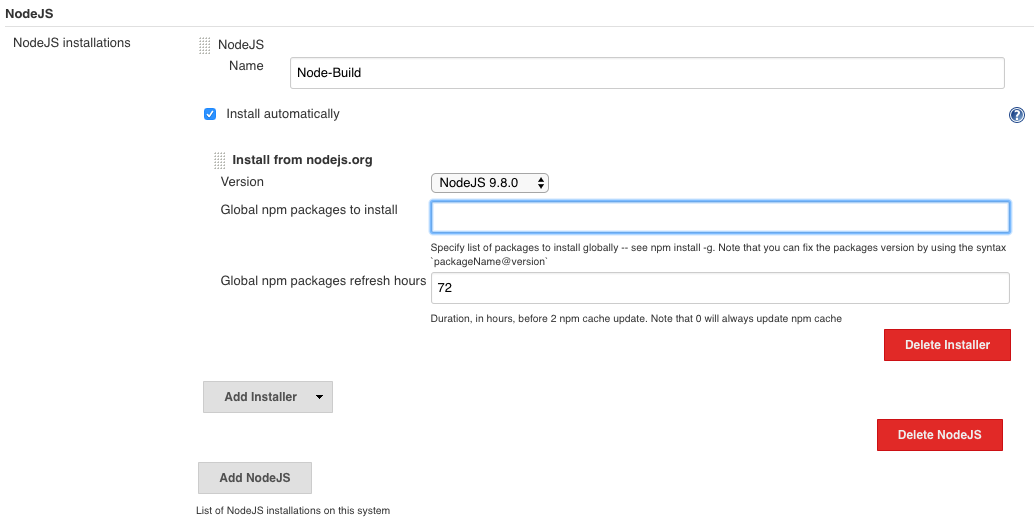
We don't require any global packages yet, but if you need some feel free to add them.
Setting up Build and Test steps
Navigate to the project configuration settings you are wanting to setup the pipeline for and go to the Build Environment. Select the name of the Node environment we just created:

Now go to the Build heading and add the following:
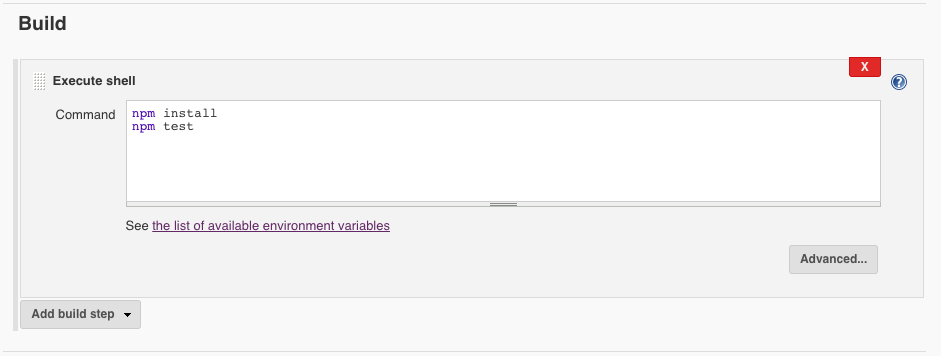
Anytime Jenkins detects there has been update from GitHub (setup in my previous blog), it'll install the app's dependencies and then test the app using Jasmine (or whatever is in the test script within package.json).
Dockerfile Node App Config
Now we have to create a Dockerfile which will instruct Docker how to deploy the app within a Docker image. Go to the root of the Node project we just created and type touch Dockerfile and put the following into it:
FROM mhart/alpine-node

EXPOSE 3000
WORKDIR /app
COPY . /app
CMD ["node", "app.js"]
This is basically telling Docker we want to deploy our files to an Alpine Node Docker image (basically a lightweight version of a Node instance). It'll copy over our built files to the Docker image and run the Node app.
Add the following to your docker-compose.yaml file:
node-jenkins-app-example:
  restart: always
  image: node-jenkins-app-example
  build: ./node-jenkins-app-example
  container_name: node-jenkins-app-example
  environment:
    - VIRTUAL_HOST=PUTSUBDOMAINHERE.harveydelaney.com
    - VIRTUAL_PORT=3000
Feel free to change the names of the container or the .yaml entry title.
Deploying
If you followed my last blog entry, you would have set up Deploy Over SSH. This is a great Jenkins plugin which makes it super easy to deploy using bash commands.
Navigate to the Build Environment section of the Jenkins project configuration and use the following settings (changing it to your project name/directory structure):
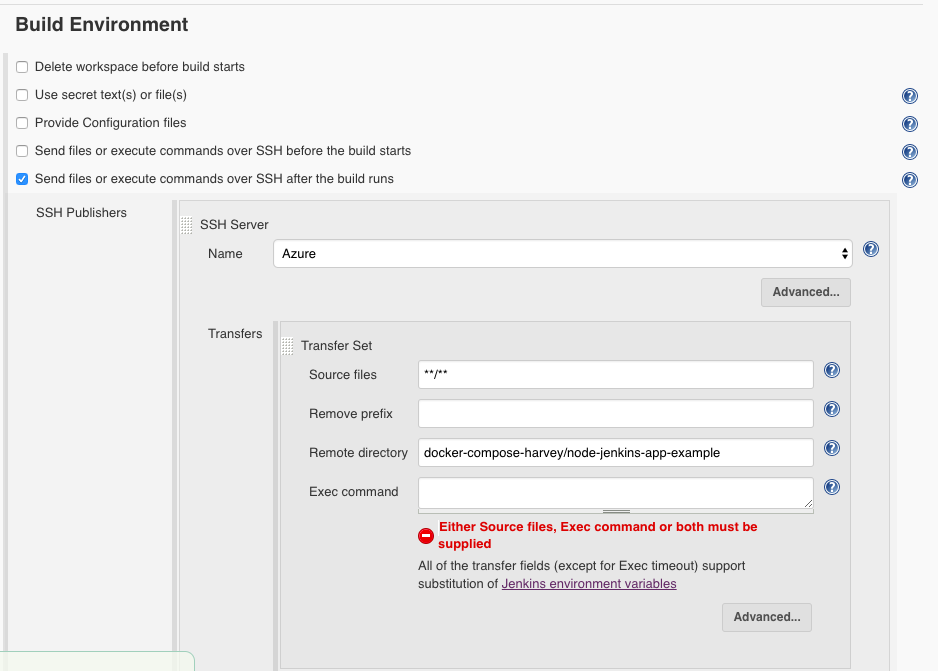
After the build/test happens and passes successfully, this plugin will copy over all our files into the directory of our choosing (we can be more selective of what we copy over, but for simplicity sake I'm copying everything).
Now, all we need to do is add a step that will re-build our Docker container and run the image. For this purpose, I created a publish.sh bash script that makes it easy to do so. On the server, in the same directory as your docker-compose.yaml file, run touch publish.sh to create our bash script and then copy the following into it:
#!/bin/bash
sudo docker-compose stop $1
sudo docker-compose build $1
sudo docker-compose up -d $1
Then run sudo chmod +x publish.sh so the script can then executed. It's quite easy to read, basically stops, builds and redeploys the specified .yaml entry within the compose file.
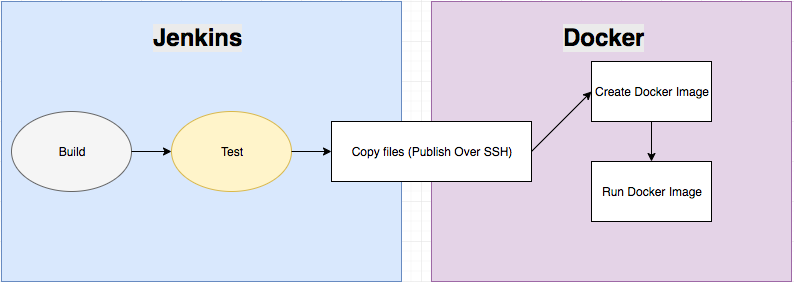
With this publish script, let's go back to Jenkins and tell Jenkins to run this publish.sh script after a successful build, test and deployment of our app:

This exec command will run after the files are copied over.
A basic summary of the flow is as follows:
That's it! Repeat for any other Node apps you wish to make. If you wish to do the same for an Angular/React/Vue app, you'd need to modify the build steps to accomodate how each framework handles building apps for production. Then you'd follow very similar steps.
Hope that helps you guys out a bit, any questions don't hesitate to leave a comment or reach out to me.